|
Examples Of Tutorial By Others
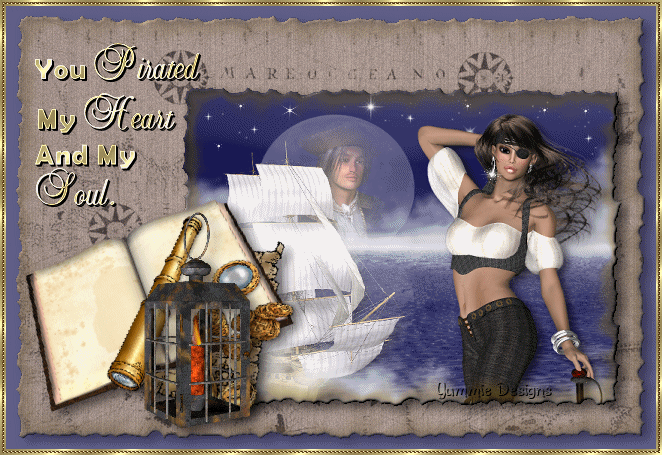
Welcome to my pirate tutorial.
Any similarities to any other
tutorials is purely a
coincidence. Of course,
most of what I have learned I
owe to other tutorial writers so
I have used techniques they have
shared with me. This is a
more advanced tutorial. I
have not used a lot of screen
shots as I do for beginner
tutorials. You must have a
good working knowledge of PSP
and Animation Shop. You may use
your own tubes/supplies.
You may have to choose colors
other then mine to match your
choices. Remember save
your work often.
What you will need:
-A
version of PSP. I used 9
but it should work in other
versions.
-Alien Skin Xenofex2. Trial
Version
Here. Put this plugin
in your plugin folder.
-Animation Shop
-My
Supplies
Here.
The
pirates, book/lantern, ship are
from
Outlaw By Design. They are used with permission.
Please do not share them
anywhere. Click her name
to go to her site and look at
her great site and pick up some
of her free tubes. Outlaw does
not require a link back to her
site but I provide one anyway.
My candle flame and sparklies
are included.
Let's get started.
Extract the tubes to your tubes
folder. Mask goes in your
mask folder. I put my
patterns in a folder and open
them as I need them.
1.
Open a new Raster image 650X450.
Flood Fill with 000040.
2.
Add a new Raster Layer and flood
fill with white.
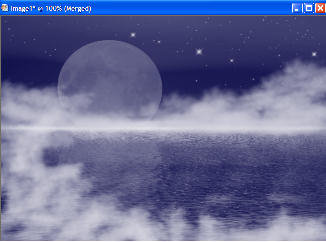
3. Go to Layers>Load/Save
Mask>Load Mask From Disk.
Find the Chat 39 mask. Fit
to layer, Source luminance, Show
All Mask all ticked. Merge
Group.
Go to Image>Mirror. This
is what you should have so far.
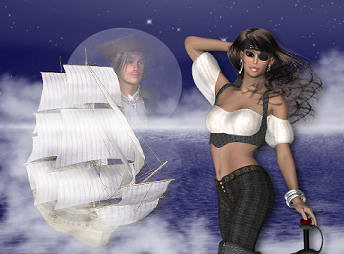
4. Open your pirate man
and woman tube, ship, &
book/lantern tubes. Copy and
paste the man as a new layer and
move him over the moon.
Copy and paste the ship as a new
layer and place it to the left.
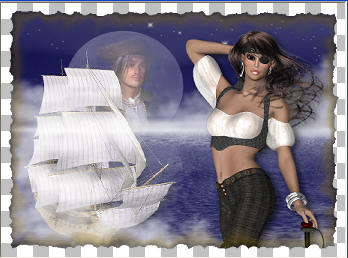
See Example above. Move both the
man and the ship under your mask layer
but on top of the blue
background. They will
appear to be fogged over.
Apply a drop shadow to the ship:
H=5, V=7, O=60, B=15,
color=black. Copy and paste as a
new layer the woman pirate.
You want to place her down and
over closer to the moon.
We are going to crop the picture
and apply a burnt edge.
You don't want to cut off her
head when you apply the burnt
edge. Apply the same drop
shadow as before. You may
close the tubes now unless you
want to use them for background
tiles later. Then minimize
them for now. Merge
Visible. Resize 75%.
This is what your should have
now:

5. Crop the picture.
I cropped mine like this:
6. Go to Effects>Plugins>Alien
Skin Xenofex2>Burnt Edges.
Make your settings as below or you
can play with them to get the
effect you like:
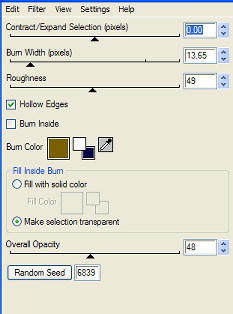
And it should look like this:
7. Apply an inner bevel as
below:
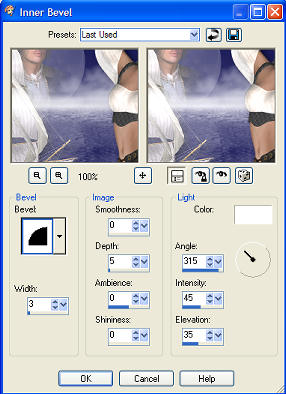
Apply the same drop shadow as
you did for your tubes above.
Minimize this for now. We
will need it later.
8. Open your map image.
Apply the same Xenofex 2 Burnt
Edges to your map. Apply
the same Inner Bevel. Apply the
same drop shadow. Add a
new raster layer. Flood
fill with color 5f5e88.
Arrange to the bottom so your
map is on the top layer.
Lower the opacity of your map
layer in your layer palette to
about 60 or what looks good to
you.
Merge Visible.
9. Open your minimized
pirate image you just made.
Copy and paste as a new layer.
Move it over to the right.
See example at top.
10. Open book/lantern tube.
Copy and paste as a new layer.
Position to the left. See
example.
11. Open the gold foil and gold
beads pattern. Change your
foreground color to the gold
beads pattern and background to
gold foil. You can X out
your gold beads background color
for now.
12. Add a new raster layer.
Choose a font. I used
Margarita and Berlin Sans FB
Demi for my text changing them
back and forth as needed.
I had to change sizes of the
fonts as I went along. Make your
settings as below. Depending on
your font, you may have to
adjust your size and leading.
Leading adjusts the space
between the rows of your text. I have mine set as below:

Move your text where you want
it. Select None.
13. Effects>Edge
Effects>Enhance. Apply a
drop shadow: V&H=1, O=100, B=0,
color=Black, Shadow on layer
checked. Apply Drop Shadow
once more.
Merge flattened.
14. Go to Image>Add border.
Add a 2 pixel border, white,
symmetric checked.
Select the white border with
your magic wand. Flood
fill with the gold fill.
Select none.
15. Add another two pixel
border, select with magic wand,
flood fill with gold beads.
Select none.
16. Add another two pixel
border, select with magic wand,
flood fill with gold fill.
Select none.
17. Add your watermark if you
like.
18. Duplicate your image in your
layer palette 3 more times.
You will have a total of 4
layers. Save as a pspimage.
You may leave your header as it
is or animate it.
On To Animation Shop Tutorial
|