|
FEEL THE
BURN
Animated
Fire Tutorial
I have so
many people ask me how to make animated fire, I decided to write a
tutorial.
This tutorial is
written for PSP 9 but should work in other versions as well. This
is my creation and any similarity with other tutorials is purely
coincidental. It is assumed you have a working knowledge of PSP
and Animation Shop.
Supplies you will
need:
A graphic with
something in it that you want the animated fire to appear.
Paint Shop Pro
Eye Candy 4
Alienskin Xenoflex2
You can get both plugins
in Trial Version
HERE.
Animation Shop
1. Open your image
in PSP. Duplicate (Shift D) 2 times and close your original.
You will need one for your header, one for your background, and
one for your sidebars and footer. Minimize all but one.
2. Add a new raster
layer.
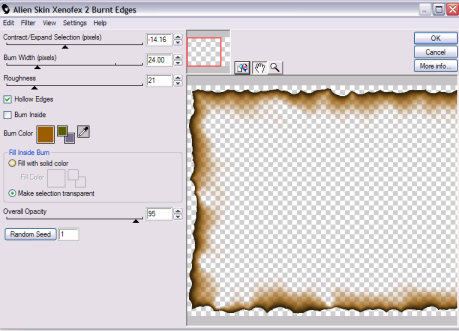
3. Go to Effects>Plugins>AlienSkinXenoflex2>Burnt
Edges. Use the following settings:
4. Use your Magic
Wand Tool to select the edge of Raster 2. Now go to your image
layer and hit the delete key. This will get rid of the border
around your burnt edges. Select None.
5. Add a New Raster
Layer and fill it with the background color of your choice. In my
case, it is black. Right click on your image layer. Go to
Arrange and Send to bottom.
6. Right Click on
any layer and Merge Visible.
7. Right click on
your merged image and Duplicate 2 times.
8. Go to your first
layer. Use your Selection Tool and select around the area you
want to add fire. I selected just around the top of the urn on
the wall. You don't have to make it very wide but it is important
to select close on the top because this is where the flames shoot
from.
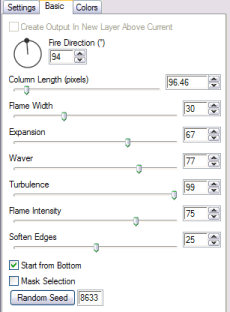
9. Go to Effects>Plugins>EyeCandy
Nature. Use these settings.
10. Highlight your
second layer. Go to your Fire filter again and change the Random
Seed to 100.
11. Highlight your
third layer. Fire again and change your Random Seed to 800.
Note: You can play
with these fire settings to get the effect you want. This is just
what I played with.
12. Select None.
13. Save your image
as a pspimage.
14. Go over to
Animation Shop and use the Animation Wizard. Set your frame speed
at 10 or whatever looks good to you.
15. Save as a gif as
your header.
16. Resize your
image in AS for your tag. In my case. I resized mine to 60
percent.
BACKGROUND
1. Open a new
transparent image 400X400. You can downsize later.
2. Open one of your
saved duplicated images. Select around the area you want to put
in your background. Copy and paste your selection(s) into the
transparent. Arrange as you like.
3. Add a new raster
layer and fill it with the background color of your choice.
4. Send your
background color layer to the bottom.
5. Lower the opacity
of your top layer so you can read typing. Crop to desired size
and Merge flattened.
6. Go to Effects>Plugins>Simple
and Apply.
7. Save as a jpg.
You can close this image.
SIDEBARS AND FOOTER
1. Open a copy of
your saved original image.
2. Add a New Raster
Layer and move it to the bottom.
3. Using your Raster
Deform Tool, move your image down so it is long and narrow. Copy
and paste as a new image.
4. Go to Effects>3D
Effects>Inner Bevel. Add Default settings.
5. Save as jpg as
your footer image.
6. Go to Image and
Rotate 90 Degrees.
7. Save as a jpg as
your left sidebar.
8. Now go to
Image>Mirror. Save as a jpg as your left sidebar
That's it. Your
finished. Now go show off your work!
|