| Table 2
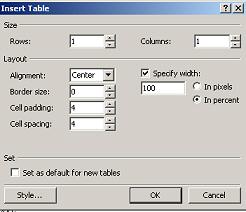
Place your cursor inside your first table. Click Table>Insert>Table. Use the settings below.
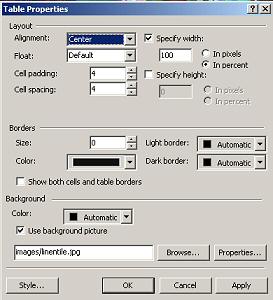
Now place your cursor inside your table again. Right click and go to Table Properties. Use these settings and browse for your linentile, open, and click OK.
Browse for your linentile, open, and click OK. This is what you will have:
Adding the Header Place your cursor in the middle of your second table. You will see the alignment tabs on your toolbar at the top.
Go to Insert on your toolbar. Go to Picture>From File. Find your "images" folder. Find and choose your top image. Click Insert. This is what you will see:
Now let's add our Welcome or title graphic the same way we did the top graphic. Hit Enter to space down. Make sure your cursor is in the middle and find your title in your "images" folder.
It's starting to look a little like a web page, isn't it? After a break, we will be ready to move on to adding our other graphics, text, and buttons. Meet you on Page 4.
|